🌾 Farming
👁️ 6 views
📖 Description
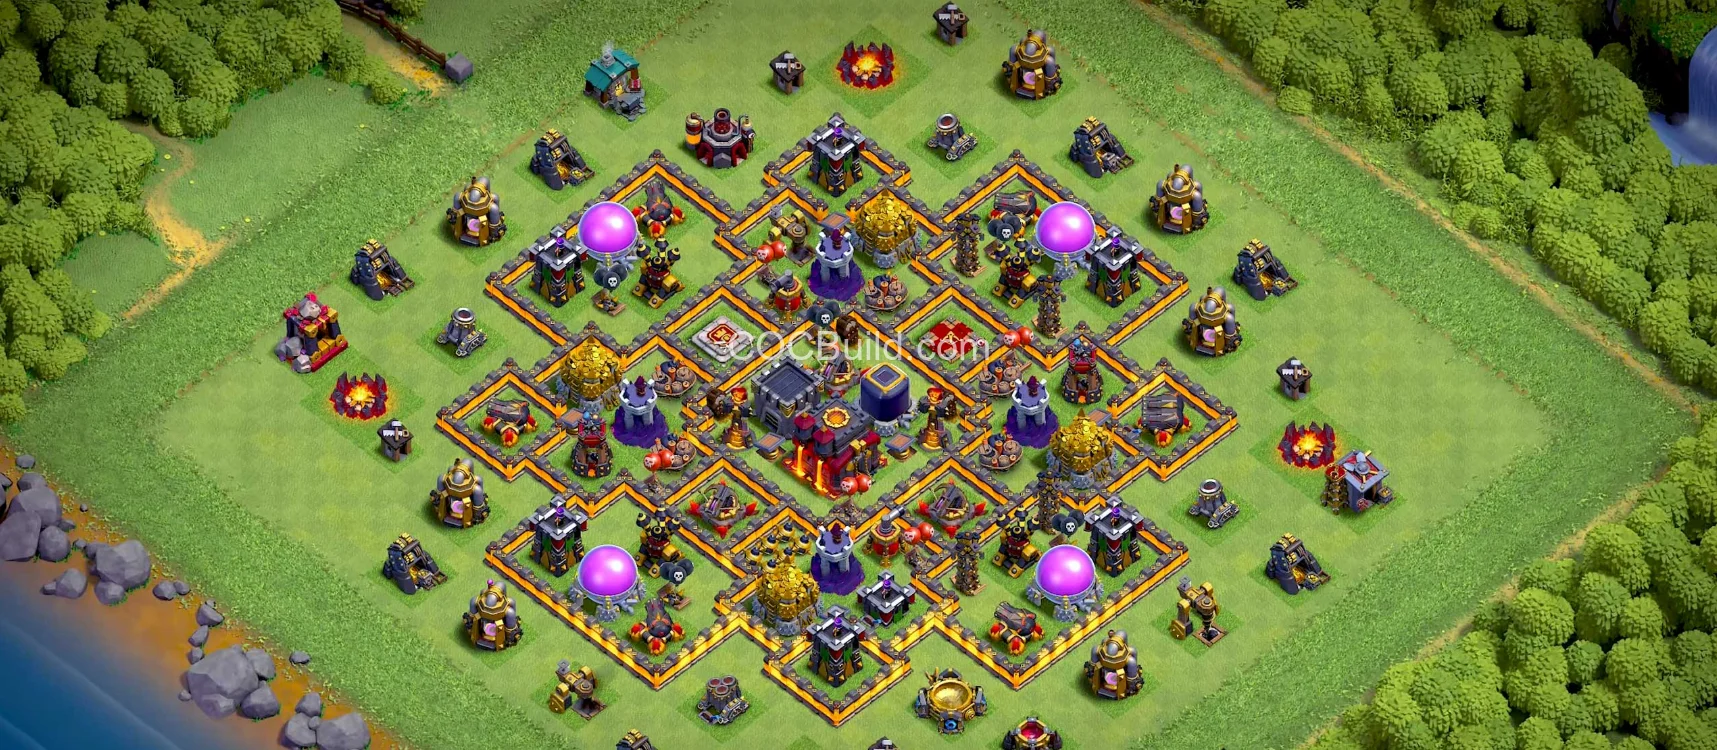
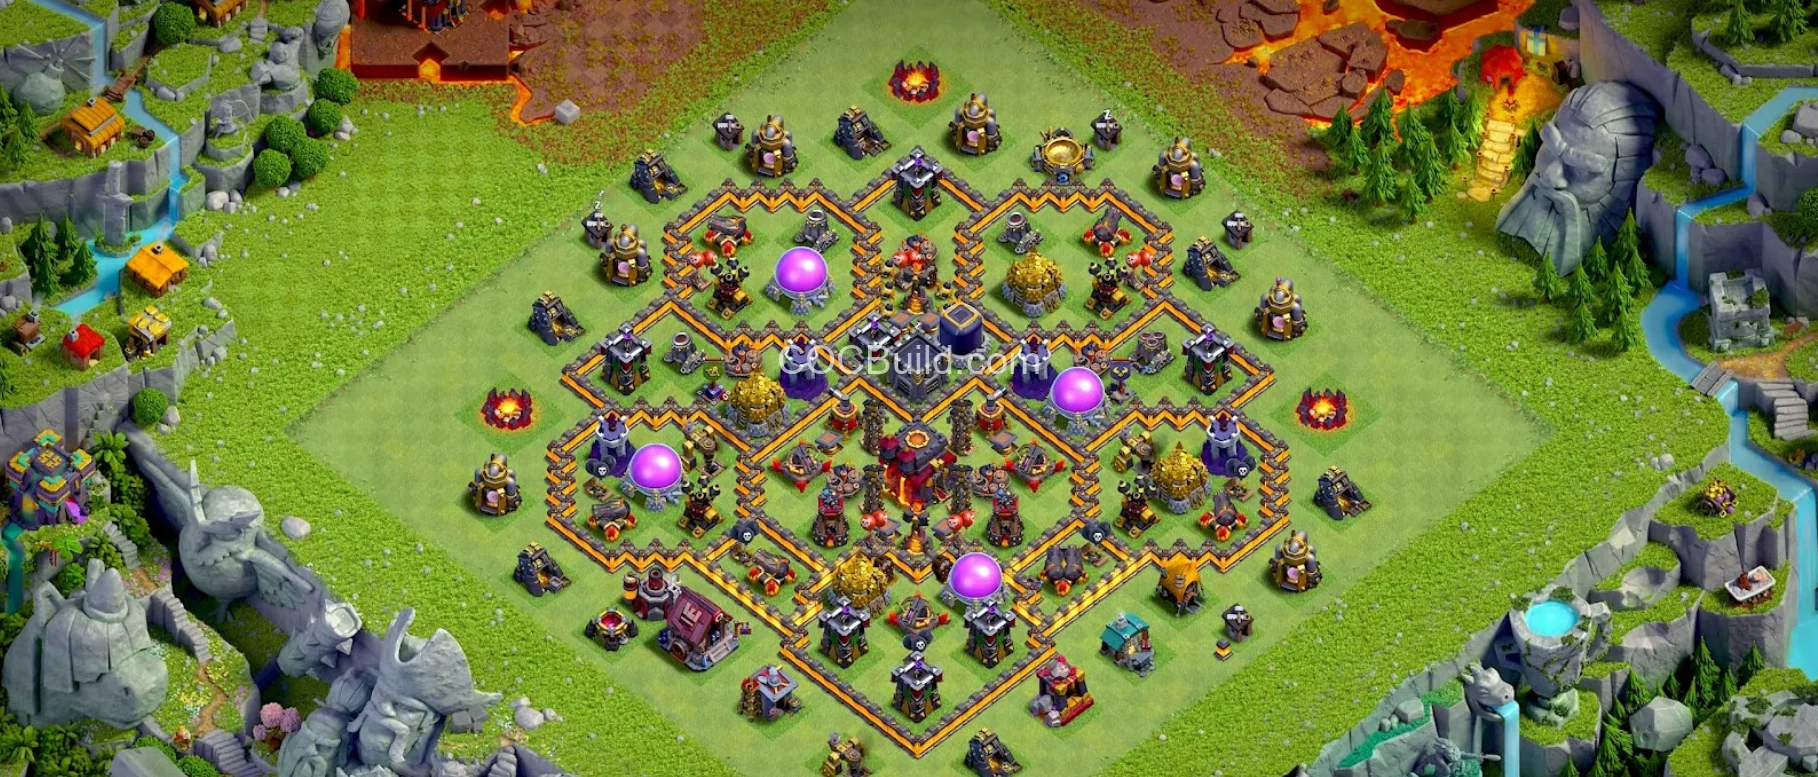
1. The Core (Heart of the Base)
The central compartment is the most fortified area, designed to:
Delay enemy troops from reaching key defenses
Protect the Clan Castle to prevent easy troop luring
House high-value targets (Inferno Towers, Town Hall)
Key Defenses in the Core:
Multi-Target Inferno Towers – Set to "Multi" mode to melt swarms of troops like Miners, Hogs, and Bowlers. Their central placement ensures they remain active for most of the battle.
Town Hall – Acts as a high-HP shield, forcing attackers to commit significant firepower to secure the 2-star.
Clan Castle – Positioned deep inside to make luring difficult. A well-stocked CC (e.g., Ice Golem + Wizards) can disrupt even the best-planned attacks.
Why This Works:
Most attackers rely on funneling to reach the core. By keeping Inferno Towers and the Clan Castle deep inside, we force them to:
✔ Waste spells early
✔ Struggle with pathing
✔ Potentially time-fail before destroying key structures
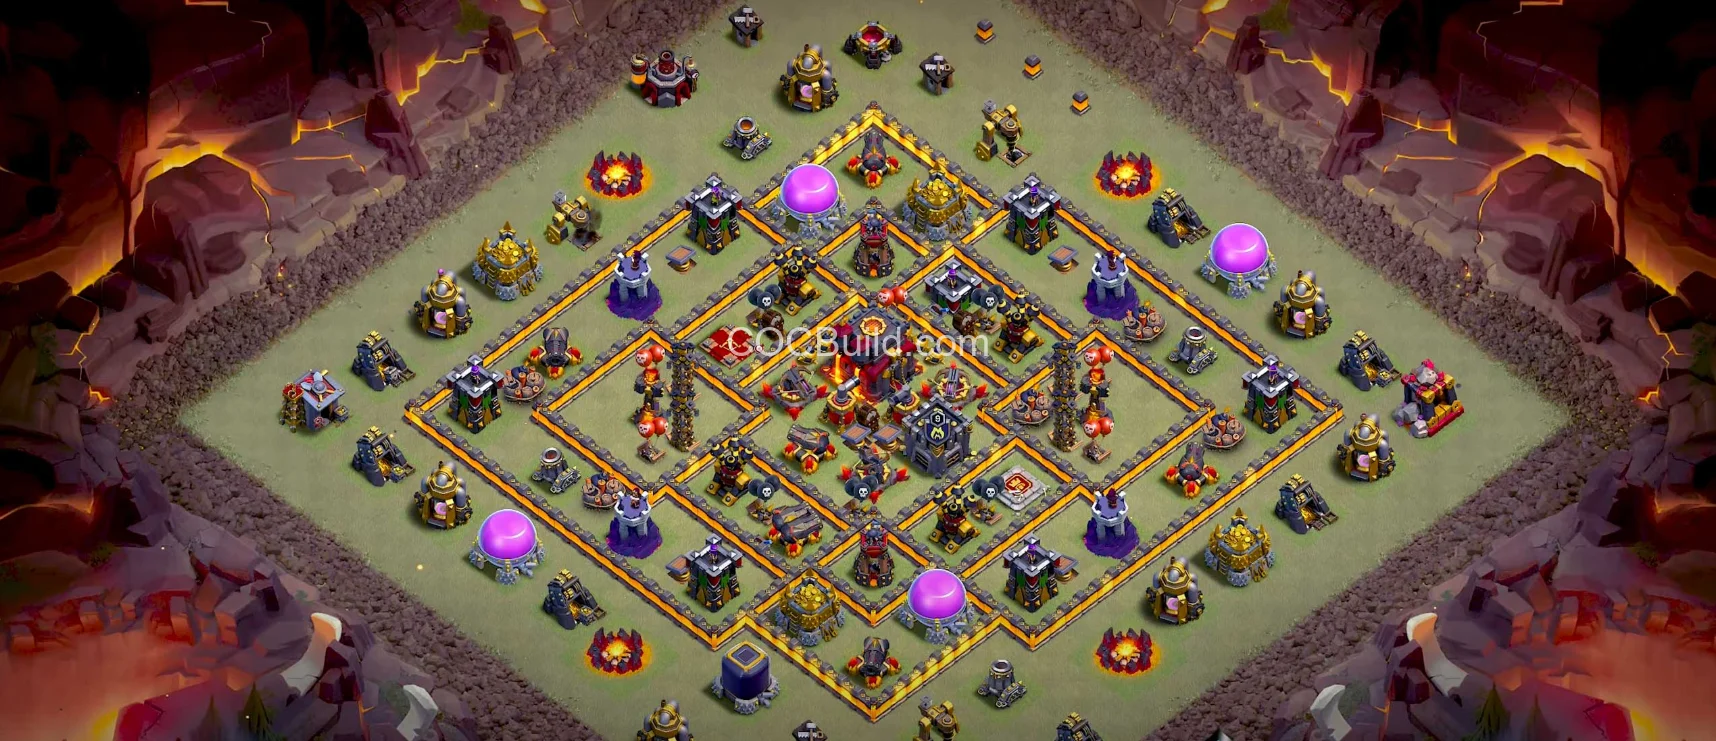
2. The Middle Ring (High-DPS Zone)
This layer contains defenses that control troop movement while dealing heavy damage.
Critical Defenses Here:
X-Bows (Ground & Air Mode) – Cover all attack angles, making them versatile against both air and ground assaults.
Wizard Towers – Placed to overlap with other defenses, creating kill zones for swarm units like Miners and Skeletons.
Air Defenses – Positioned asymmetrically to prevent Electro Dragons from chaining through multiple structures.
Trap Placements in the Middle Ring:
Seeking Air Mines – Near Air Defenses to one-shot Balloons or weaken Edrags.
Giant Bombs – Between Wizard Towers to devastate Miner and Hog attacks.
Spring Traps – Near X-Bows to fling away Wall Breakers and Hog Riders.
Why This Works:
The middle ring acts as a grinding zone, where attackers lose momentum due to:
✔ Crossfire from multiple defenses
✔ Trap activations weakening their push
✔ Heroes (Barbarian King & Archer Queen) defending key areas
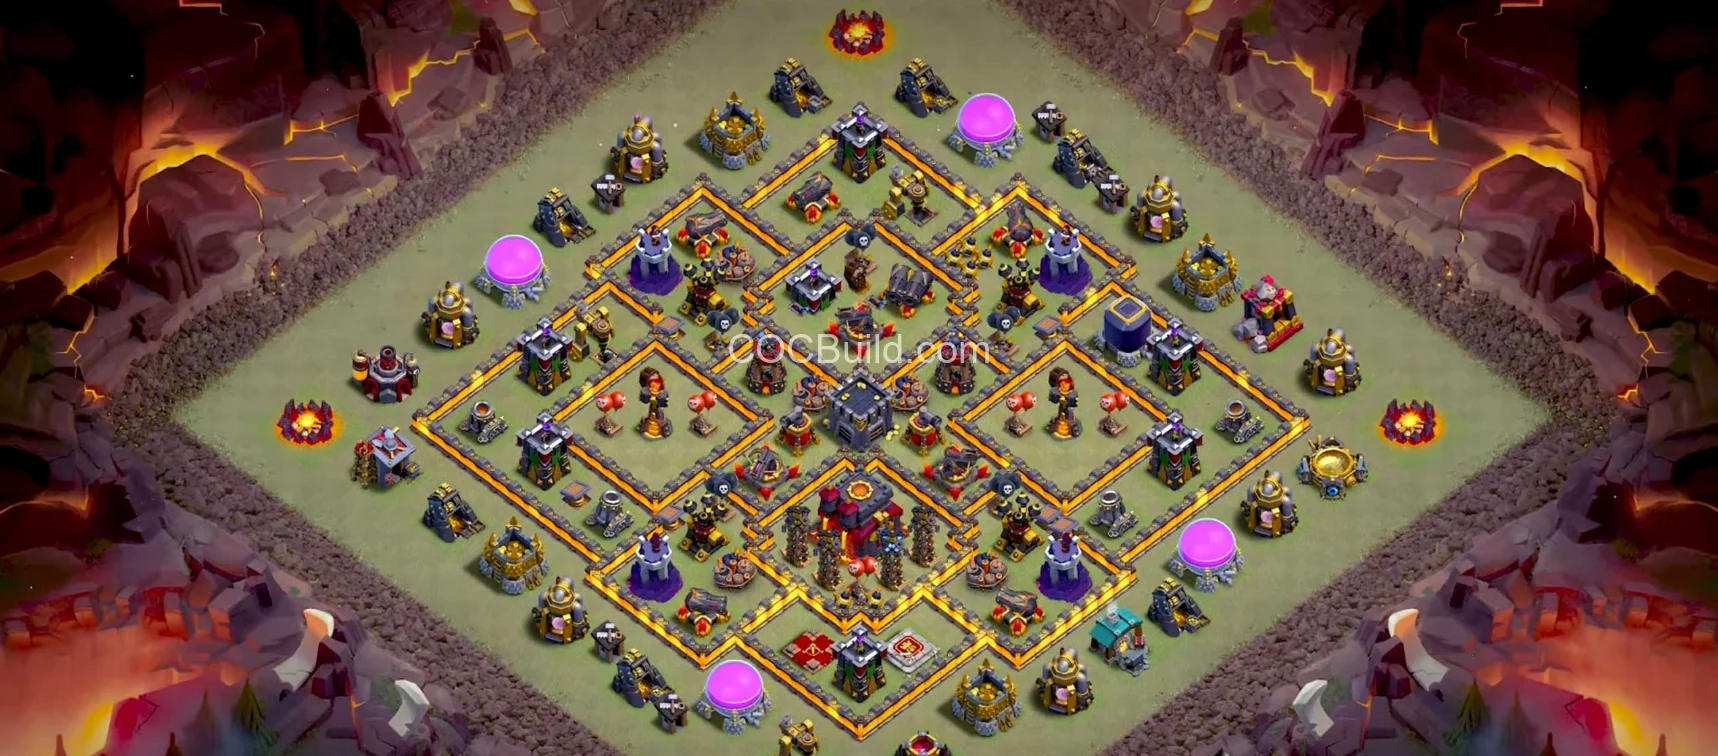
3. The Outer Layer (Funnel Disruption)
The outermost structures are strategically placed to misdirect and slow down incoming armies.
Key Elements:
Army Camps & Barracks – Act as buffers to absorb initial damage.
Collectors & Mines – Distract troops, making funneling harder.
Hidden Teslas – Placed in unexpected spots to surprise attackers.
Why This Works:
A strong funnel is critical for Queen Walks, Yeti Smash, and Edrag attacks. By scattering non-essential buildings:
✔ Attackers waste time clearing them
✔ Funneling becomes inconsistent, leading to failed pushes
✔ Troops split up, reducing their effectiveness
Defensive Tactics Against Popular TH10 Attacks
1. Countering Electro Dragon (Edrag) Spam
Why Edrags are Dangerous at TH10:
Chain lightning can wipe out tightly packed defenses.
High HP makes them difficult to eliminate quickly.
How This Base Shuts Them Down:
✔ Air Sweeper Placement – Positioned to push Edrags away from Inferno Towers, disrupting their pathing.
✔ Seeking Air Mines – Near Air Defenses to instantly eliminate an Edrag.
✔ Compartmentalized Air Defenses – Prevents chain lightning from jumping between them.
✔ Multi-Infernos in Core – Melts Edrags before they reach the Town Hall.
Pro Tip: If the enemy uses Freeze Spells, the base’s spread-out Air Defenses ensure they can’t freeze all critical defenses at once.
2. Defending Against Miner-Hog Hybrid
Why Miner-Hog is a Threat:
Miners bypass walls, making them hard to block.
Heal spells keep them alive under fire.
Defensive Countermeasures:
✔ Giant Bombs Between Defenses – Predict Miner paths and place bombs where they’ll clump up.
✔ Spring Traps Near Wizard Towers – Launch Hog Riders away from high-DPS defenses.
✔ Skeleton Traps (Ground Mode) – Distract Miners, making them waste time.
✔ Multi-Infernos in Core – Burn through Hog & Miner HP quickly.
Pro Tip: A Clan Castle with Ice Golem + Wizards can freeze and splash-damage Miners, turning the tide of battle.
3. Stopping Yeti Smash & Queen Walk Hybrids
Why This Attack is Powerful:
Yetis and Bowlers deal massive splash damage.
Healers make the Archer Queen nearly unkillable.
How This Base Counters It:
✔ Black Bombs Near Archer Queen – Kill healers instantly.
✔ Tornado Trap Near Town Hall – Pulls Bowlers/Yetis into a kill zone.
✔ X-Bows in Ground Mode – Focus fire on Bowlers and Yetis.
✔ Barbarian King Placement – Tanks damage while defenses eliminate key units.
Pro Tip: If the enemy uses a Siege Machine, the centralized Clan Castle ensures defensive troops target it early.
4. Defending Against Lavaloon (Lava Hound + Balloons)
Why Lavaloon is Still Deadly:
Lava Hounds tank while Balloons destroy defenses.
Rage Spells make Balloons extremely dangerous.
Counter Strategies:
✔ Seeking Air Mines Near Air Defenses – One-shot Balloons.
✔ Air Bombs in Predicted Paths – Weaken Lava Hounds early.
✔ Archer Queen in Range of Air Defenses – Snipes healers or Balloons.
Best Clan Castle Troops & Hero Placements
Clan Castle Recommendations
Ice Golem + Wizards + Archers – Slows attackers while dealing splash damage.
Lava Hound + Balloons – Great against air attacks.
Electro Dragon + Baby Dragon – Disrupts ground armies.
Hero Positioning Tips
Archer Queen near Inferno Towers to snipe healers.
Barbarian King near X-Bows to stall ground troops.
The central compartment is the most fortified area, designed to:
Delay enemy troops from reaching key defenses
Protect the Clan Castle to prevent easy troop luring
House high-value targets (Inferno Towers, Town Hall)
Key Defenses in the Core:
Multi-Target Inferno Towers – Set to "Multi" mode to melt swarms of troops like Miners, Hogs, and Bowlers. Their central placement ensures they remain active for most of the battle.
Town Hall – Acts as a high-HP shield, forcing attackers to commit significant firepower to secure the 2-star.
Clan Castle – Positioned deep inside to make luring difficult. A well-stocked CC (e.g., Ice Golem + Wizards) can disrupt even the best-planned attacks.
Why This Works:
Most attackers rely on funneling to reach the core. By keeping Inferno Towers and the Clan Castle deep inside, we force them to:
✔ Waste spells early
✔ Struggle with pathing
✔ Potentially time-fail before destroying key structures
2. The Middle Ring (High-DPS Zone)
This layer contains defenses that control troop movement while dealing heavy damage.
Critical Defenses Here:
X-Bows (Ground & Air Mode) – Cover all attack angles, making them versatile against both air and ground assaults.
Wizard Towers – Placed to overlap with other defenses, creating kill zones for swarm units like Miners and Skeletons.
Air Defenses – Positioned asymmetrically to prevent Electro Dragons from chaining through multiple structures.
Trap Placements in the Middle Ring:
Seeking Air Mines – Near Air Defenses to one-shot Balloons or weaken Edrags.
Giant Bombs – Between Wizard Towers to devastate Miner and Hog attacks.
Spring Traps – Near X-Bows to fling away Wall Breakers and Hog Riders.
Why This Works:
The middle ring acts as a grinding zone, where attackers lose momentum due to:
✔ Crossfire from multiple defenses
✔ Trap activations weakening their push
✔ Heroes (Barbarian King & Archer Queen) defending key areas
3. The Outer Layer (Funnel Disruption)
The outermost structures are strategically placed to misdirect and slow down incoming armies.
Key Elements:
Army Camps & Barracks – Act as buffers to absorb initial damage.
Collectors & Mines – Distract troops, making funneling harder.
Hidden Teslas – Placed in unexpected spots to surprise attackers.
Why This Works:
A strong funnel is critical for Queen Walks, Yeti Smash, and Edrag attacks. By scattering non-essential buildings:
✔ Attackers waste time clearing them
✔ Funneling becomes inconsistent, leading to failed pushes
✔ Troops split up, reducing their effectiveness
Defensive Tactics Against Popular TH10 Attacks
1. Countering Electro Dragon (Edrag) Spam
Why Edrags are Dangerous at TH10:
Chain lightning can wipe out tightly packed defenses.
High HP makes them difficult to eliminate quickly.
How This Base Shuts Them Down:
✔ Air Sweeper Placement – Positioned to push Edrags away from Inferno Towers, disrupting their pathing.
✔ Seeking Air Mines – Near Air Defenses to instantly eliminate an Edrag.
✔ Compartmentalized Air Defenses – Prevents chain lightning from jumping between them.
✔ Multi-Infernos in Core – Melts Edrags before they reach the Town Hall.
Pro Tip: If the enemy uses Freeze Spells, the base’s spread-out Air Defenses ensure they can’t freeze all critical defenses at once.
2. Defending Against Miner-Hog Hybrid
Why Miner-Hog is a Threat:
Miners bypass walls, making them hard to block.
Heal spells keep them alive under fire.
Defensive Countermeasures:
✔ Giant Bombs Between Defenses – Predict Miner paths and place bombs where they’ll clump up.
✔ Spring Traps Near Wizard Towers – Launch Hog Riders away from high-DPS defenses.
✔ Skeleton Traps (Ground Mode) – Distract Miners, making them waste time.
✔ Multi-Infernos in Core – Burn through Hog & Miner HP quickly.
Pro Tip: A Clan Castle with Ice Golem + Wizards can freeze and splash-damage Miners, turning the tide of battle.
3. Stopping Yeti Smash & Queen Walk Hybrids
Why This Attack is Powerful:
Yetis and Bowlers deal massive splash damage.
Healers make the Archer Queen nearly unkillable.
How This Base Counters It:
✔ Black Bombs Near Archer Queen – Kill healers instantly.
✔ Tornado Trap Near Town Hall – Pulls Bowlers/Yetis into a kill zone.
✔ X-Bows in Ground Mode – Focus fire on Bowlers and Yetis.
✔ Barbarian King Placement – Tanks damage while defenses eliminate key units.
Pro Tip: If the enemy uses a Siege Machine, the centralized Clan Castle ensures defensive troops target it early.
4. Defending Against Lavaloon (Lava Hound + Balloons)
Why Lavaloon is Still Deadly:
Lava Hounds tank while Balloons destroy defenses.
Rage Spells make Balloons extremely dangerous.
Counter Strategies:
✔ Seeking Air Mines Near Air Defenses – One-shot Balloons.
✔ Air Bombs in Predicted Paths – Weaken Lava Hounds early.
✔ Archer Queen in Range of Air Defenses – Snipes healers or Balloons.
Best Clan Castle Troops & Hero Placements
Clan Castle Recommendations
Ice Golem + Wizards + Archers – Slows attackers while dealing splash damage.
Lava Hound + Balloons – Great against air attacks.
Electro Dragon + Baby Dragon – Disrupts ground armies.
Hero Positioning Tips
Archer Queen near Inferno Towers to snipe healers.
Barbarian King near X-Bows to stall ground troops.
💬 Comments (0)
Loading comments...
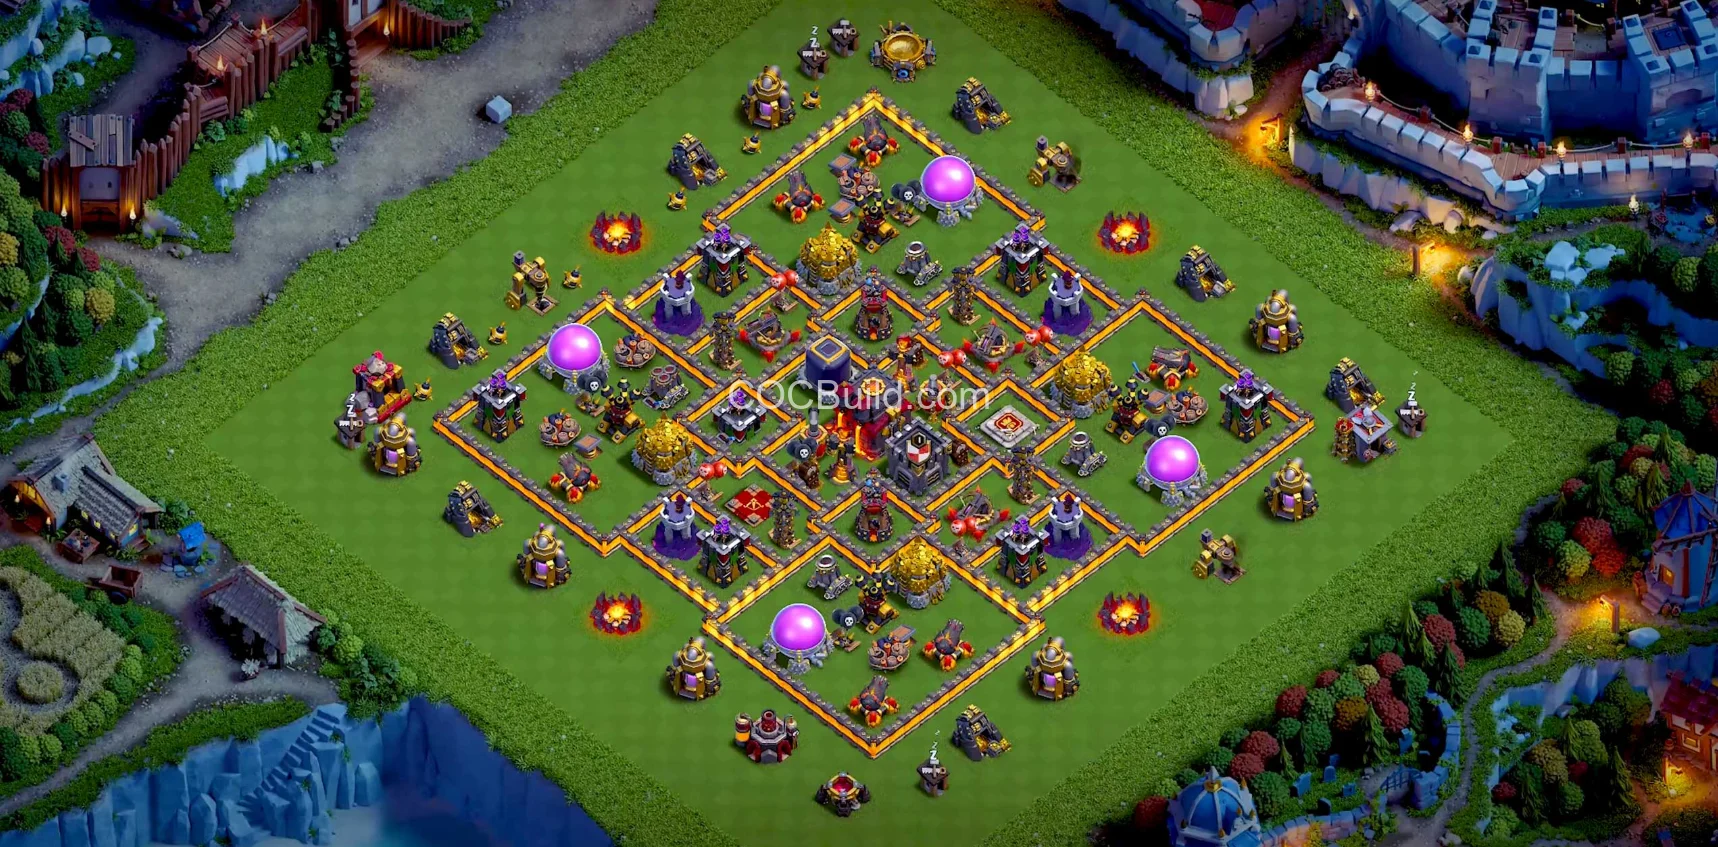
About This Town Hall 10 Layout
This Town Hall 10 base layout has been carefully designed and tested by top Clash of Clans players. With 6 views and 0 likes, this base has proven effective against common attack strategies.
Features: Optimized defense placement, working copy link included, tested against current 2026 meta attacks.
Looking for more bases? Browse our Town Hall bases, Builder Hall bases, or Clan Capital layouts.